Showing posts with label sewing. Show all posts

Friday, September 12, 2014

Linda Carr...Rib-It Rib-It!

My sister collects frogs, so I have bought her many over the years for various celebrations.  She has a beautiful back yard, so many were outside statuary or birdfeeders, and many others are what I call 'dust-catchers' (ceramic and glass) for the shelves and nooks inside her home.  When I saw the pattern for this frog bag (Vogue 8942) I immediately thought of her making it for her, but I knew it was not her style.  I bought the pattern anyway thinking it might be considered more masculine and could end up as a gift for one of my three grandsons.  The measurements (7"w x 10"h x 8"d) make it a rather small purse, so would also fail as a functional schoolbag.  Still, I felt it was so unique I proceeded with my plan to bring it to 'life. '  I decided this item will end up in my personal bag collection and could be used as a special lunchbag or conversation piece. 


Mr. Froggy hanging in a tree
Photo Courtesy Vogue Patterns

I collected the fabric over the next couple of months from the Home Dec section of my local Hancock Fabrics using their frequent and ongoing sales.  I ordered the handbag hardware from a vendor I had never used before, The BuckleGuy.com.  His service and product quality could not have been more perfect.  He carried everything I needed, from swivel clasps and turn lock closures to the 1" rings in different finishes....including the antique brass finish I was looking for.  While I was at it, I added four antique brass feet to keep the purse's bottom off surfaces and to prevent the wear-and-tear caused by some of the rough places where purses land.

The most difficult notion to select were the zippers.  You need one twelve-inch and two seven-inch zippers.  Per the pattern's instruction sheet, you are asked to remove several inches of zipper teeth to re-size each to fit the side pockets and the major opening on the frog's head, so be prepared with the proper tools (mine were zipper pliers (from Wawak.com) because I was determined to use purse zippers with metal teeth.  Be mindful that invisible or coil zippers may not be suitable for this project because of the shortening requirements.  I knew I would need to replace the zipper stop at the top, so I used a few pairs in antique brass from my stash.


My go to source for all stuffed animal eyes has been Carol's Zoo.  She has many options and prompt service, so finding eyes for the frog was the easy part of my search.

The assistance and information provided by Zipit on Etsy.com untangled all my zipper option questions and the choice of colors available were second to none when selecting the actual zippers.  The order of three zippers arrived quickly and were perfect for my project.  My hint is that you can select a zipper an inch smaller if your color does not come in the exact length you need.   It helps you avoid the task of removing many inches of teeth by choosing the shorter length rather than a longer one.  (The palm of my hand still hurts from my selection of a purse metal zipper which is heavier than the standard metal zipper...). 

It was also rather confusing because the pattern's 'fiddly' pieces were not individually identified on the large tissue that contained the strips and tabs that surround the zippers.  Vogue could have done much better on this, but you are on your own to determine the what goes where.  See the photo below as an example:


Fiddle-dee-dee!  Piece No. 26 - Vogue 8942


This tissue is number 26; the instructions say to 'cut two.'  Beginning with the upper left corner, the pieces are identified only as 'tab,' 'loop,' and 'band.'  I had to determine the top two 'tabs' were to be used to cover the top and bottom of the 7-inch zippers.  The next larger 'tab' was to be used to loop around the purse's two rings, and the far right tabs were to be used to cover the top and bottom of the 12-inch zipper.  And (in order, top to bottom) the three 'bands' were to be used as the band for the outer edge of each side pocket, the bands on either side of the 12-inch zipper, and the bands for either side of the 7-inch zippers.  I had to figure all this out, and keep them all in order and clearly marked. This did not have to be that hard!....and there were two such sheets of small fiddly pattern pieces in the pattern (the other was piece No. 21).  Needless to say, I made it through....

This project came together and became charming when I sewed the final seam; the one that closed the top of the 12" zipper and the top of the frog's head.  "Voila!"  It was truly magical and one of my favorite projects this year...a real cutie pie.  Then I had to decide the color eyes to insert.  I purchased a sets of both green and yellow, and initially I couldn't decide which one to use.  The picture below of my purse reflects my final decision.


Why am I sitting in this corner?

I don't play piano...don't leave me here!


Am I hiding alongside the brush?


Froggy Side View


Froggy Rear Showing Side Pocket and Back Opening


Would I make another one?  He is cute, but probably not.  How many froggy bags does one girl need?  LOL

Have a great day everyone!

Keep sewing, one stitch at a time!


Tuesday, July 29, 2014

Glutton for Punishment

Yes, in spite of myself, I give in to challenges and interesting projects in spite of my better judgment.  This time, after watching the ballerina skirt being created, a co-worker asked if I would use the leftover tulle to create one for her.  Hhhmmm.....didn't I just go into a tirade about selfish sewing and ungrateful recipients recently????  But,......I considered it....and thought it would stretch my abilities...so I thought about it for a few days--and agreed. 

The young lady agreed to pay me, and I could use the red tulle purchased at the same time I bought the black tulle I used for my oldest niece's birthday present.   You can see it hiding below the bolt of black I used for my niece.  Remember, both cost approximately $9-10 per bolt from the wedding/party website whose location I passed along on this previous post.

The two-layer tulle skirt was a size 6 and used 36+ yards of the 40 yard bolt.  (I will probably never sew the double-layer ruffled version again....soooo labor-intensive!)  The single length skirt, however, uses far less tulle (only about 14 yards) and only four long runs of gathers, so I agreed to whip one in red for her birthday celebration coming up the first week in August.


Each Bolt Contained Forty Yards of Tulle


Now, what I thought would be interesting was computing how I would convert the lining pattern piece (which looked like a quarter of a circle) to a pattern piece large enough to go around her waist.

The only way I can explain it is to draw you a picture of my thought process.  Take a look:
The drawing is not an exact replica of the pattern piece, but the fundamentals are basic.  I took the client's waist measurement and made sure the circumference of the top of this pattern piece was one-quarter of this measurement.  I used a math formula to compute her waistline measurement as if it were the circumference of the complete circle (indicated by the dotted line) then divided it by one-fourth to make sure the dotted line below was the same number.


I finally learned how to turn off the flash on my digital camera, so you can really see the detail on this skirt.  The young lady was outside the standard pattern size (6-22), so I used my math skills to alter the pattern to fit her.  Her waist is 58" and she requested the length end just above her knee (at 25" long).

The end result is what you see in the photographs below.  I think the skirt turned out quite well and I'm proud of my efforts.  The color is glorious, isn't it?  My co-worker was delighted.  The gathered tulle is a series of panels seamed together and gathered along the top.  To make sure her skirt looked full, I added two more panels of tulle to each layer (there are four...two are dropped about 2" lower attached to a 'yoke' ) so the gathers would cover the extra inches added to the pattern.  The only tedious portion of this work was custom-hemming the lining to cover her fullness in the back and making it gradually shorter in the front.  Hemming in this way made the skirt hang evenly all the way around.  They have tools that make this type of hemming easier.  I have one, but guess where it is?...that's right...stored with my things in Atlanta!  Ah, well!  lol


The double-faced ribbon is the most beautiful ribbon I have ever seen.  It ties so smoothly!  I'm delighted to have found the source and hate I sent the entire roll of black ribbon to my niece when I mailed her black tulle  skirt to her.   I'll need to order myself another roll, for sure!

Well, I'm off now to put the final pieces of my evening jacket together.  It is also beautiful and should be done in the next week or so.   This project was just a little sewing distraction on my normal sewing adventure, so now I can get back to my normal projects (for myself).  As you can tell, sometimes I squeeze in a project for someone else.....only if it is interesting and challenging.  Do you do the same thing?

I hope you all have been well and continue to sew whenever you can....one stitch at a time!


Thursday, June 12, 2014

Secret Dreams to be a Ballerina....

I have two nieces I have been sewing for since they were tiny babies.  Christening gowns, Easter outfits and Christmas dresses were the way I worked through my 'girly sewing' desires.  I had one son, so my sewing for him consisted of stuffed toys, shirts, robes, winter jackets and ultimately tuxedos for his formal high school events.  The girls also received custom-created Cabbage Patch dolls and AunTee-made outfits for their American Girl dolls.  I also included hats, soft-covered books and toys for them; and they were always excited to receive my gifts and appreciated my creativity and sewing ability.  Little did they realize I used these little projects to stretch my sewing horizons and expand my sewing vocabulary using small-size projects for them.

My oldest niece is the recipient of my latest project, Simplicity 1427. It fulfills a young girl's secret desire to become a ballerina or dance like one---even if its just once.  Although it does not fit into my wardrobe or figure at my age (hmmmm...maybe in a tea length???), I think it is a beautiful, soft wardrobe addition for any young lady.


Simplicity 1427
Photo courtesy of Simplicity.com

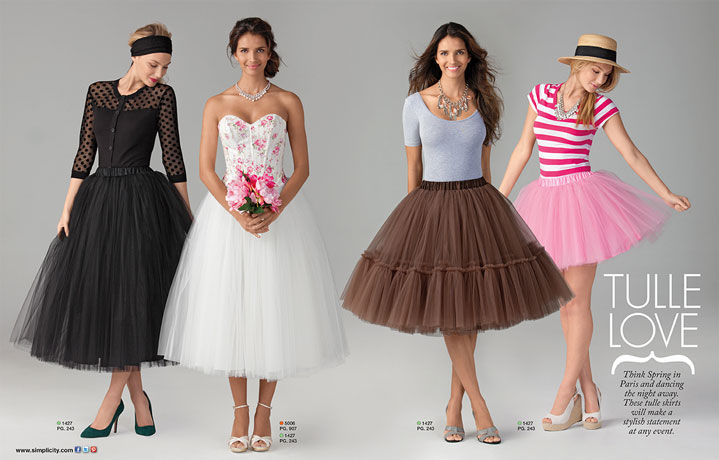
When this pattern was published, I hurried to purchase it directly from Simplicity.com.  In fact, I was so quick the smallest sizes were not available for a week or so.  I don't normally purchase Simplicity patterns, but I was willing to see if their pattern drafting had improved over the years.  Years ago, they had consistent problems in that area and bland styling designs, so I always purchased patterns from the other Big Four companies, specifically, Butterick and Vogue.

I have delayed creating a petticoat for another dress I've made because it takes so much yardage and miles and miles of gathering.  Why now?  Because I could do it for less than I could buy it, and would not need to rely on the instructions of untested patternmakers.  I put all my faith in Simplicity to have the yardage and instructions worked out perfectly, so I was willing to give them a try

My niece is a size 6, and for View B (the knee-length double-ruffled style in coffee above) I would need over thirty-seven yards of tulle.  You read that correctly....37+ yards of tulle at 54" wide, plus some fashion fabric (suggested: dupioni, shantung or taffeta) for the lining underneath it all. The taffeta was no problem to find at the Hancock location nearest me.  The tulle, however, took a bit of time to locate at a reasonable price.  If you stay away from really stiff nylon 'netting' and seek the much softer-feeling tulle in soft colors, you will be happy with your choice.

I ordered two bolts of tulle from a company I found on the internet.  There are many wedding suppliers so you may select a different one that stocks the perfect color at prices that fit your budget.  When I ordered, the website was having a sale on certain overstocked colors of tulle used at weddings, so I was able to purchase a 40-yard bolt of tulle for $11 from IdeaRibbon Wedding and Fabric Supply.  The colors on sale at that time were very limited, so I just selected black and red.  This link is another company that offers many colors, including tulle metallics and animal prints.  I also purchased beautiful double-faced 4" wide satin ribbon for a bow to tie around the skirt's elasticized waist was from The Hairbow Center at a very reasonable cost.  The customer service for both companies I used was surprisingly good, and I recommend them.

It did, however, take a while to cut the skirt out.  There are only three pieces for the lining, so I made it first.  The plain polyester black taffeta I purchased filled the bill.  No design questions or confusion, so it was finished and put aside fairly quickly.


Underskirt and Tulle Yardage
Simplicity 1427

The tulle portion of this project involved a little more work, though.  The ruffle required I cut that pattern piece 36 separate times against the foldline.  These sections were to be sewn (short side to short side) with double rows of stitching (1/4" apart within the seamline).  Each seam was to be trimmed and ironed to one side (sides in this case are considered the left side and right side of the skirt).  Then, the ruffles (in two 18-segment lengths) are folded in half lengthwise and gathered at the folded edge before being joined to the skirt front/back sections.  The skirt front/back is a pattern piece cut against the foldline sixteen times.  Then, there is what is called the 'overlay' which you are asked to cut against the fold twelve times.  The overlays are grouped and placed between the front/back ruffled layers and the taffeta underskirt.  I like that the underskirt has a yoke holding most of the gathers slightly below the elasticized waistband.  What this does is smooth the transition from the waistband gathers to a place a few inches lower, making your waistline appear smaller and the gathers less bulky because they are all not placed at the same spot.

Now, I don't wish to scare or discourage you from attempting this project yourself, but let me make you aware that following the instructions for each of the sections will take a considerable length of time.  You will rack your brain to think of an easier way to accomplish all of them.  I did--that is, racked my brain.  My 'solutions' did not necessarily expedite the process, though.

I purchased a double needle to avoid stitching the seam twice---it only darkened the stitching line, so I decided not to use it.  I also considered sewing french seams, but discarded that idea because the seams would not disappear, but would actually become more pronounced.  I tried to iron the tulle absolutely flat prior to cutting it....too time consuming.  I purchased multiple yards of stabilizer to determine if I could sew smooth straight in the tulle or needed to use something to sew underneath it.  The stabilizer was too difficult to pull away after the double rows of stitching were made.  The seams were fine without it, so there was no need to use it.

The only thing I will recommend is that you iron the selvage smooth (the tulle arrives rather rudely wrapped around the bolt) and use painters tape to hold the selvages together smoothly on your cutting surface.  Decide whether you will cut all four layers of tulle at once following the suggested fabric layout or just say, "Hang it!" and cut them one at a time (like I ultimately did).  I didn't have my largest cutting surface with me, otherwise, I would have definitely used a flat surface (like a dining table with my largest healing mat, i.e., Olfa) and use a rotary blade to cut the skirt pieces against a straight-edge ruler or yardstick.

If you decide to make the double-ruffled view as I did, measure your skirt front/back after your seams are joined, and use that measurement to pull the exact length of ruffle you need.  Trying to pin it together and pull the gathers to match the width of the skirt front/back is not as easy.

Otherwise, the entire process is straight forward, one step at a time...fundamentally one thing after the other until you're done. The entire cutting process can be completed even if you must cut each piece one layer at a time.  Take your time to make sure you are consistently identifying the same right/wrong side of the tulle so your seam allowances are all on the same side of the fabric.  (Yes, I goofed in this regard a couple of times myself, so check and double-check your work...lol).


Ballerina Posh
Photo Courtesy poshandspicy.wordpress.com
Double ruffle Chic
Photo Courtesy poshandspicy.wordpress.com

A few suggestions for the patternmaker or sewists using the pattern's current instruction sheet.  The instructions should be re-written for each view.  When constructing View B, it was disheartening to read, "...Continue same as View A, C.  Refer to steps 5 through 11."  As you can imagine, this caused much paper-flipping and marking on my instruction sheets.  As a matter of fact, I wrote Simplicity Customer Service to clarify an instruction to set aside one single-layer overlay for use later when I could not find where it was ultimately used.  The Customer Service promptly answered (within 24hrs!), and I was delighted to be able to move forward with the project.  Anyway....read through the instructions thoroughly prior to beginning any stitching.  You will be pleased that you understand the process ahead of time.

Now, the one thing that will wear on your nerves is the length of time it will take to pull the gathers, particularly for View B, the one I created.  Begin with a full bobbin each time you begin to sew a row of gathering thread.  (I sewed two rows of gathers, so remember each should begin with a full bobbin.)  Be careful to not pull so strongly that you break the gathering threads.  Remember, the two ruffle sections are sixteen segments (each) sewn together!  There are no marks that regulate how to distribute the gathers, so at least fold the ruffles lengthwise to mark side seams and distribute them evenly on each half of the overlays.  Do not be confused, these two ruffles attached to (1) a skirt front/back of a single layer and (2) another doubled layer of skirt front/backs (basted together). 

Below are pictures of the completed skirt with tops I made from a piece of FabricMart crushed velvet and some black mesh from my stash.  I used this pattern for Top 1, and made a second top from View A adding long sleeves as the second option.  What do you think?  If you would like to read a review of these two patterns, let me know.  The McCall's pattern presented a few obstacles, but I was able to convert them to design opportunities.

I tried to find a black cashmere sweater in her size, but was unsuccessful.  That will be something I will seek throughout this year.  I used the black mesh and combined it with something in her favorite color.  I'm sure she'll get many occasions to wear this skirt set, through both summer and winter.  This is a gift for (her third) Mother's Day and her (June) birthday.  I hope she likes it!


Top 1
from McCall's 6705
View A with long sleeves from View D

Top 2
from Vogue 8950
View B


Simplicity 1427 View B
Finished Skirt

Simplicity 1427
View B

Vogue 8950
View B

McCalls's 6705 top
Simplicity 1427 View B

I do NOT plan to make this skirt again.  I will, however, make a tea length version for myself in a soft butter yellow or antique gold.  It is now enroute to my niece.  I hope she appreciates all my effort!

Keep stitching, one stitch at a time....!


Sunday, April 20, 2014

Anne Klein at EasterTime....

Do you remember getting ready for Easter?   I do...!

It was the one time in the year when my hair was curled and my whole family dressed up with hats and gloves to celebrate the holiday.  I don't really remember if I concentrated on the true meaning of the holiday, but I remember practicing over and over in the weeks preceding it to commit to memory an Easter verse of some length (depending on my age), and being celebrated as smart and articulate following my recitation in front on the entire congregation at our church or Sunday School class.  I remember the great Easter meal that waited at home.  It always included deviled eggs, a ham with pineapple and maraschino cherries decorating the top, and plenty of home-made rolls....hot and buttery from the oven.

I no longer give Easter speeches or visit the main street or parks of the city to participate in Easter parades, but I seem to always prepare a dress to wear in celebration of the day.  This year, my fabric came from FabricMart, and was actually on sale for only $2.40 per yard when I bought it a few months ago.  My pattern selection took a lot of fabric (in my size (16) it took 3 1/2 yards of 60" fabric) because of the dress details, so I was looking for a low cost fabric to make this outfit.  I purchased 4 yards and felt I did a good job in reducing the cost of this project.


Vogue 1358
Courtesy of McCalls Pattern Company

I used Vogue 1358, and made no changes to the pattern in the process of completing the garment.  I do wish I has lengthened the hemline, though.  Vogue seems to be making them shorter and shorter nowadays.  The dress was one of the things I cut out on my one of my cutting marathons, and the garment required a lot of single layer cutting, which as you know, is tedious and time consuming.  The fabric is a lightweight burnout, and a good substitute for the silk, chiffon, charmeuse and crepe de chine fabric the pattern recommended.  The dress is fully lined, and I wish I had lined it with a fleshtone lining instead of the snow white poly I selected.  With my dark skin, the only unlined portion, the burnout area in the sleeves, contrast with the other sections of the garment, and could have been handled differently.  But, at least it will be cool and this summer will not require a slip when I wear it.


White/Black/Brown Animal-like Print Burnout
Poly/Cotton Shirting
from FabricMart

What may not be obvious is the dress has a pointed collar with a stand and a separately added facing at the ruffle that closes the bodice with a hook and eye.  The front of the dress joins with differently-shaped left and right skirts at the waistline, but the back of the dress has only a center back seamline.  I would suggest anyone trying this pattern to MARK THE PLEATS CAREFULLY.  There are a lot of them all close to one another!  Also, take the time to baste the narrow hems required around almost every piece of the garment's raw edges (including the lining).  Turning these raw edges evenly and carefully will determine the final finished appearance of the garment and will keep it from looking "Becky Home-ecky."  The interior seamlines are joined with french seams, keeping everything neatly finished.  Practice making them and remember to begin the first stitchline with wrong sides together!  I had to pause often because the right and wrong side of this fabric was so similar.  I can't imagine how it would be looking for the 'right' or 'wrong' side if I had used a piece of silk or charmeuse.  I'm sure I would have had to employ painters tape to mark them, but with this fabric I put the non-shiny side of the fabric outside.  Sewing at night was the only time the differentiation presented a problem.  

Will I make it again?  Probably not....This pattern was a lot of work for what was rated as an average-level challenge.  I did learn something new, though.  I put the collar together using a method I've learned since I began blogging, and I am very pleased with the finished appearance of the collar and stand.  I will be using it from now on and recommend this method to other sewists, too.  

I have also learned the secret to the success of a garment is to not be fearful of trimming the collar (and other interior) seams.  I've never trimmed confidently or thoroughly before.  If the instructions told me to trim to 1/4", I would probably trim it to 3/8" and would rarely grade the seams if there were multiple layers of fabrics in the seams.  But, I urge you to do it!...It makes such a difference in your finished garment!  I love when each sewing experience teaches me something new about sewing more expertly and confidently.  This dress taught me two good lessons.


Hung in front of the light
to show the sheerness of the fabric and lightness of the dress

Button and Loop at Dress Waistline
from G Street Fabrics

My local Hancock Fabrics just did not stock the proper button.  A black button seemed too dark, and a white one was too stark.  So I ventured on my second driving expedition in the DC area to reach G Street's famous button wall.  I just knew they would have a transparent button with black striations....and they did!  They cost $1 each (I needed seven...including the extra one I always purchase to hide inside an interior seam allowance), and their total was almost as much as what I paid for the fabric!  Do any of you do the same thing?  I will always pay the cost for the perfect button....they always make the outfit.


Finished Product

I wish you could see the detail on this dress.  I still am not expert on photographing garments in my sister's house....so I apologize for the repetitive surroundings.

Close-up of dress bodice

Dress Back

Dress Interior and the Shoes

Thanks for coming along for the ride.  I've got so many other garments to finish before the end of the month.  It's getting warmer and warmer, so sewing will lighten up, too!  Drop me a line if you have any questions.  I love comments, so feel free!  'Til next time....take it one stitch atta time!.....

Sunday, March 16, 2014

Okay...Where Were We?....

Have you been thinking of me?  I certainly have not forgotten you!  I've been busy and sewing between the holidays and regular days since my last post.  It's now about time I brought my friends and readers up to date on the specifics of these activities.

One thing I've begun since moving cross country (about a year ago) began because I currently have no dedicated sewing space.  I now have begun to work on multiple projects simultaneously.  It's only because when I cut something out (my least favorite part of the process), I must clean up and return the area used back to its original appearance.  So, I seem to have begun to cut out multiple projects at a time.  It's fine, but I've always been a 'one-project-at-a-time' sewist, so it seems to be taking me a longer time to get anything to the point where I can blog about the process.  I rarely hoard fabric or purchase it without a specific project in mind.  I worked at a fabric store during my son's last two years of high school and accumulated a lot of fabric at a substantial discount during those years.  Moving (and paying to move) lunks and trunks of this yardage cured me of hoarding.  Don't misunderstand, I still love beautiful fabric, so when the fabric is purchased, the next step is to cut the project out, organize it with the associated notions, and work on it with the hours or minutes I have available.   With that as a background of how my life currently works, I will share with you how my current minutes have been spent.

The things I seem to sew are things that make me stretch my talents and keep me open to new sewing experiences.  Most of the time, the projects I select appear nowhere else on internet blogging sites (like patternreview.com or the personal blogs on blogger.com or wordpress), so there are very few sewing hints or completed examples of identical projects posted by others.   I feel more like a pioneer in the sewing world.  Part of that is because I have been sewing for so many years, the 'standard solid-color-shift-dress' sort of sewing doesn't seem to interest me any more.  New and interesting designers do, though....and working with new and interesting fibers and textiles....and incorporating my other talents (cross stitch/embroidery/silk ribbon embroidery/quilting) keep my creative projects interesting.

I did take everyone's lead and create a dress from the ever-popular Vogue 1314 by Tracey Reese.  I bought an ideal  soft, patterned knit fabric from the local Hancock sale table for it.  My sister (another seamstress) copied me and rushed to the local store buy two yards for her own version in another color.  I had no problem with her actions because we've had many, many sewn items in our closets that are from the same pattern since we were little girls.  We always end up in identical clothing in different colors, and the picture below proves how proud we were of my mothers sewing talent (and our new bicycles). lol  


'The Girls'
Back in the Day in Nebraska

Weren't we adorable?????  Bows and all!..hahahahaha!!!!!...My sister would die if she knew I posted this pic, but you won't tell her, so she will never know...right?  I would have rather shown another pic of us at Easter in some identical frocks we wore that year.  She and I recently laughed long and hard about our holiday outfits as tried to remember which color hers was versus mine.  She didn't have a copy of the picture and mine remains packed away.....so, instead you get this little glimpse into our history.  We are a year apart in age and a size apart in clothing.  I think her interest in sewing no longer keeps pace with mine, but, she remains a creative individual and my creative backboard with a very good eye for style and 'the arts.'


Vogue 1314
Photo courtesy of McCalls Patterns

This pattern had been produced many times, so I was able to incorporate some design changes to improve the fit.  Invaluable were the suggestions made by Sarah, one of my favorite bloggers, posting to Goodbye Valentino. I had already completed my dress by the time she wrote the blog about this pattern, but I went back and opened the side seams to incorporate the changes she suggested.  It improved the garment dramatically, and I plan to make it again with the RTW changes the designer made to the original dress. Also...thank you, Andrea (posting from Knit-Knac.blogspot.com)  for the inspiration for my second version of this dress....I love this dress and the changes she plans to make to it; I am currently seeking the ideal fabric to duplicate the new version of this pattern, too.


Vogue 1314
Front Neckline

Wow!...my blogs are too long....but I can't leave without telling you about a couple of other projects 'in-process.'  This second one is taking a long time to cut out.  It took a long time to find the fabric and a few additional days to read the pattern instructions to make sure I understood the construction process.


Vogue 8957
Image Courtesy of McCalls.com

I LOVE this evening jacket!   I am making View B (shown above) which is sleeveless by design, but I will be adding the tiny cap sleeve from View A.  The jacket is fully lined and is put together by joining a series of split circles lengthwise (the number depending on the size you are creating).  The pattern in my size required 5 yards of fabric 60" wide.  The instructions suggest a template be made for the three circles, and they be cut from the yardage a total of 68 times...that's right....no typo...sixty-eight times!  The circles are joined by french seams (my choice) and the edges of each ruffle are to be double-rolled after staystitching.  I don't recommend this project to anyone fearful of handwork or as I've seen it called "fiddly" handwork.  It will be beautiful, though....and I will keep you posted on my progress.


Vogue 8957
Over 60+ pieces of fabric!

My non-sewing machine handwork includes cross stitch.  My current project is a little black girl in a yellow dress.  The pattern was purchased from an Etsy vendor, and I am working diligently on this every day for the past month or so.  She reminds me of my childhood when the neighbors used to refer to me as that 'big-legged girl.'  As you see, she has braids and ribbons, too, so she holds a special place in my heart.  I'm not sure if she will become a pillow or be framed on my wall, but she will be one of a pair of little black girls whose charts are waiting to be completed.  I know, more of tedious work that calms me and currently strains my eyes.  I am getting older....


Little Girl in a Yellow Dress
Cross Stitch
Okay....that's all for today.  This post has taken too long to compose.  I hope you enjoyed the update.  I haven't told you about my Easter dress because its soo springy and the weatherman is predicting another snowstorm tonite in my area.....sigh!  I will also include my completion of a summer version of the ever-popular Vogue 8728.

Vogue 8728
Photo Courtesy of McCalls.com
I goofed putting together the belt buckle, so I am re-doing that portion of this project.  It also includes a lapped zipper....I still detest the invisible type, but, I am getting better at them.  This vintage dress required an old fashioned installation at the side seam.  I'll show you the result on my next post.  It's been fun!...comment any time.  If I've omitted anything, please ask....I love comments and appreciate hearing from everyone who visits!

Remember....Keep going....one stitch at a time!....


Wednesday, October 30, 2013

Shaken from the Doldrums...

 Yes....it has been that long.  Where have I been?  Close by...closed up and closed in.  Like many of us, dealing with my personal demons...healthwise and otherwise.  Now I am better, as it is always revealed  when you step outside yourself and think of others not as fortunate as you--in spite of whatever your current circumstances are.  Just be reminded, we are fortunate to be alive today...many are not.  We are fortunate to move free of debilitating pain....many are not.  And, Rhonda Buss (author of Rhonda's Creative Life,) an expert sewist and fellow blogger, reminded so many of her readers that many of those not so fortunate are children, much younger than we who have had many more years of life.  I felt I needed to participate in the Mary Bridge Childrens' Hospital Pillowcase Project she sponsored, and it helped snap me out of my malaise.


Thank you, Rhonda.....thank you thank you Thank You.  You are an angel to the children who get to pick a pillowcase for themselves, and to those of us who felt the joy of guiding each stitch in our donated pillowcases. The picture above is the pillowcase grouping I created.  They are not perfect and have unique flaws which set them apart from the factory-created examples.  My overlock blade was often too dull to cleanly sever several bulky seamlines, but, I kept sewing.  At the end I was visualizing even more fabric combinations but forced myself to stop after completing twelve.  I put one of my vintage printed labels in each one, hoping the child that chose one of them would find it and wonder who was the creator.  They honor my three grandsons, all healthy and growing up in sunny northern California.  All are rather boyish looking, although I did throw in one with purple and red flowers just for me.  (smile)

Well, that has taken up only a portion of our yearlong separation.  The other time has been filled with sewing, and I have several posts currently in draft status, just waiting to share the final garment on a dress form or on my body.  I have lost so much weight, they will fit differently better, but, I currently have so few opportunities to dress up and model them with the proper accessories, days months have passed by.  I promise to reveal them soon, even if they lie on the floor!

There are several crafting projects to complete, too.  Below you will see three examples of decoupaged cigar boxes I am completing for my son and his oldest two boys.  They were covered with napkins purchased at The Party Store ($1 per pkg).  Each napkin was roughly torn and slapped down with ModgePodge inside the lid and outer surfaces of each box.  Isn't the lizard eye menacing???!!!  My oldest grandson will love it!  The bottom of each box will sit on four colored flat-bottomed marbles and each top will be hinged and latched with hardware I purchased from an overseas Etsy seller.  The inside of each box will be lined in green felt, and it is my hope they use them to store the secrets and treasures accumulated over their lifetimes.  I hope they keep them forever and never surprise their mother by storing a tarantula or frog inside.  lol....


I actually wanted to share a source for my favorite straight pins, but the cigar boxes added so much more visual interest to the picture I included them in the shot, too.  The large blue can in the foreground holds five thousand extra long superfine Iris straight pins!  All those sewists (like me) who do not gravitate toward using ball head pins (except on dressforms) will love these pins.  They are very thin (superfine) and extra long (1-3/4") which remains ideal for old-school sewists who still pin pattern to fabric a majority of the time.  And, I confess....they work great with the bad habit I have of sewing over pins with my 401 Singer Slant-O-Matic.   I know, I know...my sister has told me I can't do that on any other machine.....including her $2000 Bernina...lol  So far, it has worked fine in certain cases (to ease in set-in sleeves especially), so I will continue this horrible, horrible habit another 50 years until I begin to throw off machine timing or begin breaking straight pins one after the other.  I also have the habit of cutting out several garments at once, so I no longer fear running out of my supply of these special pins before I remove them from other projects.

While my son was still in high school, I worked as a training instructor in a (now defunct) fashion fabric store in Fremont, CA.   I fell in love with the extralong pins they carried, and purchased six or seven packages of them, each containing 300 pins.  Well, this year I opened the last package and found out the company is no longer in business.  WAWAK has their replacement, and I am glad I was able to find them.  (Atlanta Thread Supply went out of business and WAWAK took over their customers, website and inventory.)  Looking for a pin that does not snag your fabric and holds a maximum area flatly and smoothly, check these out.


Don't forget me!  This blogging community is amazingly supportive and I have learned so much from its contributors.  My sewing has improved immensely, even though I have been sewing over 55 years, so thanks to you all.   I love the fact that there is still so much more to learn.  I hope to become a frequent participant and encourage your comments.  If you would like to see more detail on the cigar box project, just let me know.

Til next post, take care of your health and take each stitch....one atta time!

Cynthia


\


Friday, September 21, 2012

Wedding Attire


New Look 6124
 
M y youngest niece asked me to sew her a dress she could wear at an upcoming wedding she had been invited to attend.  Because I have been sewing for her since the day she was born, saying yes was no problem at all.  About a month ago I came to live with her and her mother, so I had the opportunity to fulfill her request with her new measurements.  I also wanted her to become more involved with the pattern and fabric selection this time around, and this was a prime opportunity. 
 
Young adults are so computer literate now, so she was easily able to look through the online patterns available, and selected a very simple style with the newest craze:  the peplum.  Her selection was New Look pattern 6124.  She asked my opinion for fabric options, and I quickly guided her away from the standard satin (too many wrinkles) worn too often by wedding guests and suggested the less-gaudy shantung.  She and I took a road trip to the local Hancock's where the fabric was on sale in her favorite color for only $2.99 per yard.  She was excited the cost was so low because (this time) she was paying for it.  lol...The entire ensemble was less than $25...including the pattern!
 
 
Pattern and the prepared fashion fabric and button
 
Now, the photo that follows was the result of all the recent classes I have taken on fitting and altering paper patterns.  This young lady is six feet two inches tall, size 6 pattern with a D-cup bustline.  I underlined the dress in a matching lightweight cotton, and she gave me her permission to post a finished picture of her in the dress on my blog.  Needless to say, she was delighted.  The two frosted buttons are an irridescent turquoise overlayed on a burgundy base that matched the suede shoes she wore.  A road trip to G Street Fabrics was coupled with a side trip to Rita's for a treat was the icing on the entire process. 


New Look 6124
(front)

What did I do differently?  Well, I decided to eliminate topstiching the tabs 3/8" from the edge as suggested in the instructions.  And, I hand finished the bottom of the peplum instead of topstitching it down.  I put in an invisible zipper (including the proper way to finish the facing on the inside) using one of the many instructions and hints posted by fellow bloggers on the internet.  I had almost forgotten the most important instruction:  that is, to begin the zipper installation after fusing interfacing in the back seam allowance....a critical step with this particular type of fabric, for sure!


New Look 6124
(rear)


I lengthened the back waist to 17 1/2". and slimmed the skirt bottom to more of a pegged look.  Her mother (my sister)  didn''t have any hips until she gave birth to her, so I suspect this young lady has inherited the same physical trait.  Slim hips are perfect for this style of dress, and the kick pleat left her ample room to stride down the aisle with the bride's son. 


I told her to have fun, take pictures, and smile.  She was so happy when she bounced down the ramp, I couldn't help but feel happy I had been a part of her joy.

Thanks for checking out my blog....I haven't been posting a lot, but I have been sewing.  I don't want to be lost like the bloggers mentioned in MPB's blog.  Thanks for stopping by to check on me......

Keep sewing....one stitch at a time!!!

Monday, May 7, 2012

Waiting for Vogue Patterns to Answer....

You haven't heard from me in a while, but that doesn't mean I haven't been sewing.

Let's see....

A new grandson arrived about 8 weeks ago, so I've been putting together little things for him.  His middle name is Drake, so his Dad has asked that I make him his own dragon (which is a derivation of 'Drake'). So, of course, it is in process.  (Isn't he a cutie-pie?)

Grandson #2

I am also in the midst of preparing for the upcoming June family birthdays (my only sister and my eldest niece).  I usually make gifts and stay away from trying to finance what I would really love to purchase for them.  So, that pressure is on, too.


Since my last post I have also completed a king-size quilt and have decided to send it off to be quilted by someone with a longarm quilting machine.  The quilt is to be raffled off by a social club I belong to.  Initially, the club members agreed to participate in its construction, but in the end no one pitched in (should I be surprised?).  I managed to get through it with the help of one member, and will now send it off to be professionally quilted before I put the binding around it.  I'll let you know how this new experience turns out.


The baby quilt for my eldest niece's baby is also completed, but I am still deciding whether to purchase a Flynn Multi-Frame quilter and suffer through the learning curve to finish the small quilt myself.

I have finished the Vogue coat I mentioned in my last post, but will show you pictures on the my dress form on my next post.  I really just wanted to post this entry to ask you a question....

I recently looked at the new Vogue patterns and fell in love with the white Lialia dress pattern by Julia Alarcon (Vogue 1305).  I was so excited about making the dress, I purchased the pattern at the very end of the previous pattern sale.  I have since purchased the fabric for the pattern and begun to cut it out.  This is only a problem because I have noticed an error (?) in the layout for the dresses lining.

This pattern has extra-long pieces that must be joined prior to cutting (in addition to requiring each piece be cut on single-layer fabric--but that's another topic).  The dress' lining layout shows different piece numbers joined together than the cutting layout for the fashion fabric.  Has anyone else run into a problem where the layout (or sewing instructions) have an error?  What did you do/what would you suggest I do?

I have sent an email to Vogue regarding this matter, but am unsure if I should wait to hear from them.  Has anyone else made this dress already or have a solution for my question?  If you have already purchased this pattern, would you take a look at the instructions and tell me if I am wrong?   The lining layout shows piece 1 (top) joined with piece 3A and piece 3 (top) joined with piece 1A.  Is there ever a logical reason for the pattern pieces to switch like this?

I certainly have a lot to do while I wait to hear from them.  In the meantime, I would certainly like to hear from you!

Great stitching....keep going....one stitch at a time!...

Cynthia

Tuesday, February 14, 2012

As I Back Out the Door....

The last few weeks of clearing the belongings left in my childhood home have been really, really stressful.  The circumstances under which the ol' homestead is being sold brings to the surface all the childhood memories from 1961, the year our Buick deposited our clan from the Nebraska flatlands to grow up in the middle of a growing area soon to be identified as Silicon Valley.  I will be sad to leave, even though I have always felt 'mid-western' and have shed the 'California-girl' mindset and beach goddess figure pressures I felt as an adolescent transplant.  Why did we come?  My sister's fragile health issues and the better California school system (at that time) was what they told us kids.  It was hard leaving our neighborhood and childhood friends and grandparents.  Sorting through papers left behind, there were also other skeletons rattling the leaves of the family tree that clarify why that dramatic decision was made.  Secrets were buried when my father suddenly died within 3 years of our arrival.  My mother never moved from the house my Dad bought for us, and amassed an amazing pile of what I can only refer to as 'stuff' in the 50+ years she lived here in a further attempt to bury family secrets.  

"The Kids"(c)
...And I'm moving the 'stuff' left in her wake.  I am now so removed from considering the value of these tangible 'things' I feel quite free to donate and trash the stuff I previously planned to sell for a king's ransom.  At this late date I'm literally giving everything away and not giving it another thought.  That's a good thing, right?  I did decide to repair and store my grandmother's Domestic (converted) treadle machine, the family picture albums and documents to further investigate and document my family tree.

Because this house is where I began (machine) sewing, I suddenly felt I wanted to consciously complete one more garment before I left the familiar walls, sounds and lighting of this house.  Of course, my way of releasing tension is to immerse myself in some mind-numbing stitching, so I dug out Vogue 1199 and the fabric had cut out a while ago.

Vogue 1199 rear view (untucked)
Photo courtesy of McCalls.com 
Since no one has previously reviewed this blouse on patternreview.com, I will attempt to post my first review of this garment there later this week.  Someone did complete and review the skirt included in the pattern (with positive comments), so I will add it to my list to complete from a yet-to-be-found wool gabardine.


Vogue 1199 front (untucked)
Photo courtesy of McCalls.com
Vogue 1199 front
Photo courtesy of McCalls.com

So, here follows some visual views of my version....


Front

Back

Fringed Ruffle close-up
If you don't look closely, you could miss the pintucks on the front and back of the top.  I think there are approximately 20 on the front and a similar number on the back.  These tucks were my meditative touchstone for a couple of hours each night.  The most difficult part of the process was marking them.  This particular garment demands proper marking.  The sleeve swirl (what I call the ruffles within the sleeve), collar ruffles and sleeve hem are finished with fabric strips cut on the straight grain and frayed 1/4" at the edges.  

Stay-stitched Edging 

Front Pintucks
Be sure to pull the single thread cross grain to ensure this pattern piece is perfectly straight on grain (pattern piece #9).  There is a reason I know what can go wrong here...lol.  Using 60" fabric, you would only need to purchase another 1/8th yard.  Using fabric 45" wide, this helpful hint will not help you...devising how to invisibly join the end will need to be created.  The shirt tail hem is a simple edgestitch.  A single button closes with a fabric loop at the neckline.  I moved the loop higher than it appears in the photograph.  I haven't picked the button yet (here I come Stone Mountain & Daughter!). The fabric was on sale for $1 yard at a JoAnn's sale and is a shrimp-colored lightweight polyester crepe.

Beside taking the time to complete each step to the best of your ability, I only have two construction suggestions:  

One.....cut the pattern piece for the ruffles at least 7"-8" longer in order to avoid piecing the strips.  None of the strips were long enough to completely cover the required edge without piecing them.  

Two...As you complete each tuck, take the time to tie off and trim the threads of each one at the top and bottom.  I didn't do this (sigh...) and now have to devote an evening to tying off these threads.  

I had a great time doing this blouse and plan to do another one.  I have a similar weight crepe in white and will dig it out of one of the bins I have packed and sew it for this spring/summer.  This blouse requires a lot of marking and basting.  If basting is not your thing, this may not be the project for you.  The next one will have an FBA adjustment and I won't be moving!...lol

Thanks for dropping by and reading about my latest sewing project!  In preparation for my move I have many projects cut, marked and ready to sew.  I hope you continue to stop by to see what I'm doing and share your thoughts in the coming months.  Please excuse the picture quality....for some reason some of them are so fuzzy I  had to resort to including cell phone photos as replacements.

I will be seeking out new notions at a nearby quilt show next weekend (free!) with a sewing buddy of mine.  I hope to test run some new sewing machines, overlocks and blind stitchers.  The sewing blogosphere has shown me my beloved Singer 401 is not the only girl on the block....lol    Happy Valentine's Day!

What do you do to relieve stress?  Do you take it one stitch at a time or use another activity?